On rear window nozzles

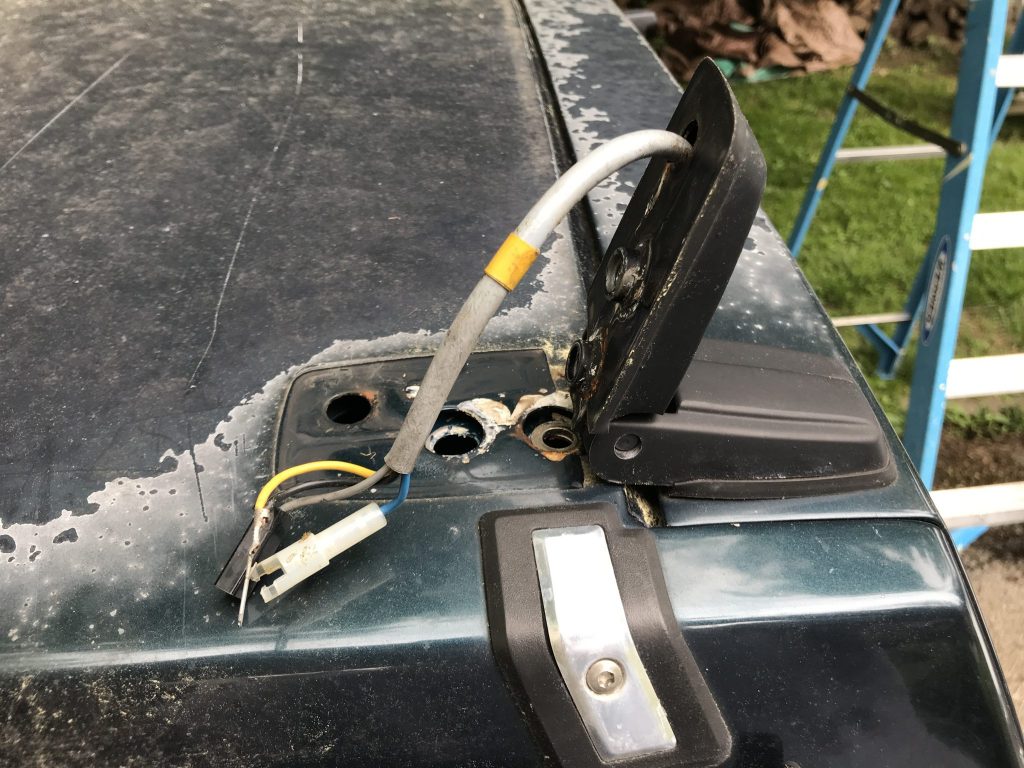
In the course of replacing the gate wiring harnesses I also had to disconnect the rear window washer nozzle. The nipple over which the fluid hose connects is actually inside the gate. This meant that I had to remove the nozzle in order to reconnect the hose. I Googled around for instructions on how to do this and found a number of people also asking the same question but no real answer. So for the benefit of the internet, I bit the bullet and tried to do it myself.

From memory (and photos of the part I found online) I knew the nozzle was kept in place by plastic tabs. This meant that they probably would be flexible enough to be removed, maybe even without breaking! I selected a plastic trim removal tool with a notch in the end and worked it down around the stem of the nozzle where it entered the gate.When I felt that I had pushed it down as far as possible I levered the tool back. After a bit of tentative attempts I finally used enough force and the nozzle popped off, thankfully still intact.

The anatomy of a washer nozzle

As the photo shows, the nozzle is actually a three part assembly. There is the main section, the part that actually attaches to the gate and provides a fitting for the fluid hose, the outer housing that provides a small slit that constricts the flow of washer fluid and creates the spray, and a foam gasket that helps keep water and other liquids from entering the inside of the gate. You might notice that my foam gasket has ripped a little, probably a result of the levering action required to remove it from the gate. This is probably unavoidable unless you’re super careful as the section of foam that ripped it quite narrow. Perhaps inserting the tool from the bottom might have worked better. Anyway, I might be able to fix it with a dab of rubber cement or I could cut a new one from the neoprene I used to rebuild the air box gasket.

A half-useful weekend

After a long while, the weather decided to cooperate and be pleasant on a weekend day where I had some free time. So I decided to tackle the rear wiring harnesses.

Disassembly

Armed with instructions I had downloaded from our friends at iPd, I dove in. The first thing that needed doing was detaching of the headliner in the rear. I had previous dithered on this because my initial meek attempts at removal were unfruitful. It turns out that this was because I was following the instructions too closely and attempting to remove the liner with just my fingers. I had purchased a set of hooks and probes awhile back for a different purpose and decided to see if they helped. Indeed they did! Using a hook the headliner peeled back perfectly and with almost no effort. I was in! The next step was to star loosening the retaining bolts. On my car these consisted of two bolts that held the hinges to the body and two large screws that held them to the tailgate. With the help of my older son, who was gracious enough to climb inside and actually remove the fasteners while I held the tailgate to keep it from falling, we got them all out and lifted the gate from the back of the car.

Continue reading

I’m not slacking!

There hasn’t been much of an update here in a while. I swear, that has more to do with a lack of time to blog rather than work on the car. To give you an idea of what nonsense I’ve been up to, I’ll give you a sneak peek and a promise that I’ll get stuff written down soon.

Found the sockets

After a little hunting around I realized that those two stray bulbs mentioned in my last post where actually part of the climate control panel. I removed the two screws holding the panel in and was able to slot the sockets back in so that the blower and temperature controls are properly back lit.

After everything is back together it all seems functional. However the rear defroster light doesn’t like to turn off after being turned on. This may be because of the damaged wiring in the rear gate hinges that I have yet to replace. Also the AC switch doesn’t light at all. I was told the AC doesn’t actually work so it might be related to that, or the switch itself is bad. AC functionality is way down the list of stuff to fix, so I’m not concerned right now. I’m just glad all the bulbs are functional.

Speaking of those rear wiring harnesses, I’m very eager to get those done but for two things. First, as usual, is the weather. It seems that every time I find space to work on the car the heavens open and pour rain (much like it is doing literally as I write this). The second is that to gain access to the wires I need to pull off a section of the headliner in the back and thus far my small attempts to do that have shown the thing to be very stubborn. I have read how it stays on – there is a rigid lip over which the headline is stretched and clamped – but I’m hesitant to yank as hard as is seemingly required to get over this lip. I think I’ll eventually just have to bite the bullet and pull the thing until it comes off. Once those wires are fixed the back end of the car should be pretty much done.